Thousands of measurements are made every day by Timbeter users worldwide. Our team is always ready to answer questions and solve the most diverse problems and situations of our users. New concerns may raise even when they have already made a lot of measurements and navigated through the different functions offered by our solution.
For this article, we bring some solutions related to the use of the Storage Module, where all measurements are saved and can be edited, reports generated and shared, data is seen by users at various levels and customization is made. Within the storage module, Timbeter users find an easy way to organize all work done through the solution.
Below, you will find tips for 12 frequently asked questions from advanced users of our solution and answers to make measurements with Timbeter even better.
1 – How to add a new device?
To add a new device, there are two ways through the Storage Module (log in from timbeter.com). When logging into it, click on the gear – Settings – icon, where you will find the “Devices” menu. When you click on it, you will see your device and also the two ways to add new devices: one by sending a link to an email address and one by manually adding it through a code. Choose the option that best suits your needs.

2 – How to make the most of the web storage module?
In the Storage Module, you will find all the images made with the Timbeter app. Here, you can find a simple way to report, edit measurements and share data. In the top menu, you will see* “Reports,” “Inventories” and “Storages.” The upgrade package and also your homepage is available in the upper menu bar.

Each of these functions helps you better organize your workflow, share information, and make reports. Also, you can compare inventory’s income and outcome real-time. All the information can be shared via URL where you can inform your team or third party of all steps to be taken within the process.
*”Reports” and “Inventories” functions are available on demand. Contact our team to make the most of the Storage Module.
3 – How to add manual measurements?
On the Storage Module initial screen, you will find your measurements already taken with the device. In the sidebar, you will see the “Add manual measurement” function.

By clicking on it you will find the following screen.
Add the data* and save your new measurement. It will be available along with the others and can be included in reports later on.

* Manual measurements have no image for viewing.
4 – How to add new users to the Storage Module? Do they have access to the same data as me?
In the upper right corner, in the gear icon, you will find the “Users” menu.

By clicking on this menu, you will find the page with the users connected to the Storage Module. To add a new user, simply click on “Add User”.

Enter the email of the new user and send an invitation. The new user will then receive a message to begin using the Timbeter Storage Module.

You can still edit whether they will be administrators, editors, or just measurers. These functions can be modified at any time by an administrator. Non-administrative positions do not have the same rights as administrative positions concerning stocks, reports, and editing.
5 – How to add my tree species, cull and other custom data?
In the upper right corner, in the gear icon, you will find the “Timber” menu.

In addition to the species already available in the system, you can add your own qualities of woods. They will be available in the app on your tablet or smartphone as soon as it is synced.
Here you can add a new wood type,

A new wood quality,

A new wood characteristic,

Or specific cull.

All this new information will be available on the system the next time your device is connected to the internet
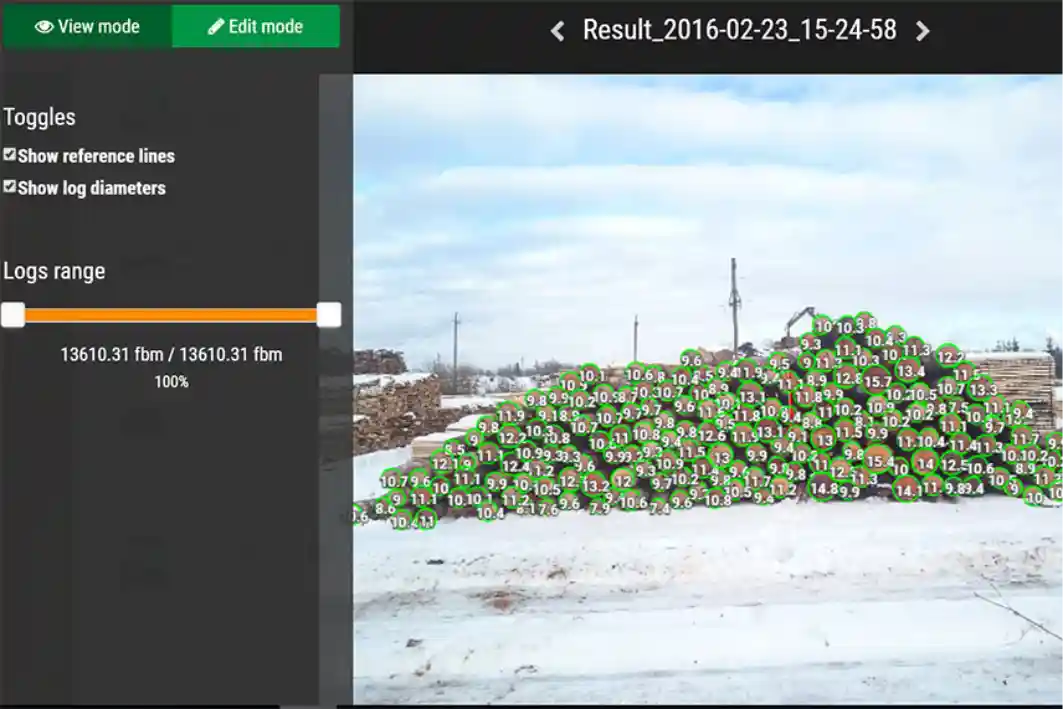
6 – What to do when the Timbeter does not detect all diameters?
In the absence of adequate brightness, low camera resolution, or poor contrast, the software may not detect all logs. You can either edit an existing measurement by “Edit existing” on your device or make it through the Storage Module on your desktop.

In the Storage Module, click on the image you want to edit and click on “Edit Mode”. Here you can edit the reference, logs and density area.

*The edited measurements will appear in the Storage Module with a red asterisk next to the volume.
7 – How to use the automatic cull of some diameters?
When measuring with a device, under the “Measurement options,” a user should click on “Advanced measurement options” and then “Cull by diameter.” The software will automatically reject unnecessary diameters, making your work easier.

In the “Timber” menu, you can edit the reject types according to your needs, as seen in item 5.
8 – How does in-app density work?
When the density is measured with the help of Timbeter, a figure will appear below the volume measurement. This number is the density measured by the software. You can use this factor to measure the volume of a stack and make comparisons.

Also, you can also use the “Density” function in comparison to some standardized coefficients, which will give a much more accurate volume to your piles.
9 – What’s the difference between “Save” and “Measure and Save”?
When you merely “Save” your measurements, they are only stored in the device and need to be measured later through the same device and then sent to the Storage Module with an internet connection. When you “Measure and Save” the images, they pass through the Timbeter algorithm and then are sent to the Storage Module*. There, you can edit these measurements and make reports.

*Measurements are sent to the Storage Module only when the device is connected to the internet. To make measurements, you do not need any connection to the internet.
10 – How to make a good report with Timbeter?
In the Storage Module’s “Reports” menu, you can organize all data, send it to your team in real time and synchronize this same data with a system you already use daily for inventory income and outcome.

Timbeter reports are time-saving, shareable, have digital proofs, and still allow you to make integrations. Contact our team to learn more about them and how to integrate with your existing systems.
11 – What’s the difference between Timbeter and Timbeter Container?
Our team has developed two solutions: Timbeter and Timbeter Container. The first is software for measuring wood logs in field or trucks: measuring diameters, piles, and density. Timbeter Container is a unique solution for those who are exporting logs and need to organize their containers. There, you have the Bill of Lading numbers, the number of containers to fill and specific features.

Contact our team to learn more about the Timbeter Container and its unique features.
12 – About panorama mode
Many of our users use the panorama function daily to measure long piles. Our panorama function can detect a number of piles with images that vary from device to device, so we recommend that our users always perform an initial test (when using an Android device) to know how many panorama images they can take, as this number varies by the device for some reasons.
Our recommendation is also to have the user close all other applications that are running on the device at the time of panoramic capture, as memory consumption can impair capture.
Also, we recommend measuring and saving measurements immediately after capture. In case of editions, these can be performed later, as explained in item 6.
If you have any difficulty with panorama mode, please contact our team.
Do you have any specific questions or tips that you would like to share with us? Send your story either via social networks, email on info@timbeter.com or in our chat through the website. We’d love to hear more about our users’ experiences!