Timbeter provides an effortless solution for pile measurement. Our solution automatically detects the surface of the pile and draws the border around it.
It is also possible to measure the height of the pile.
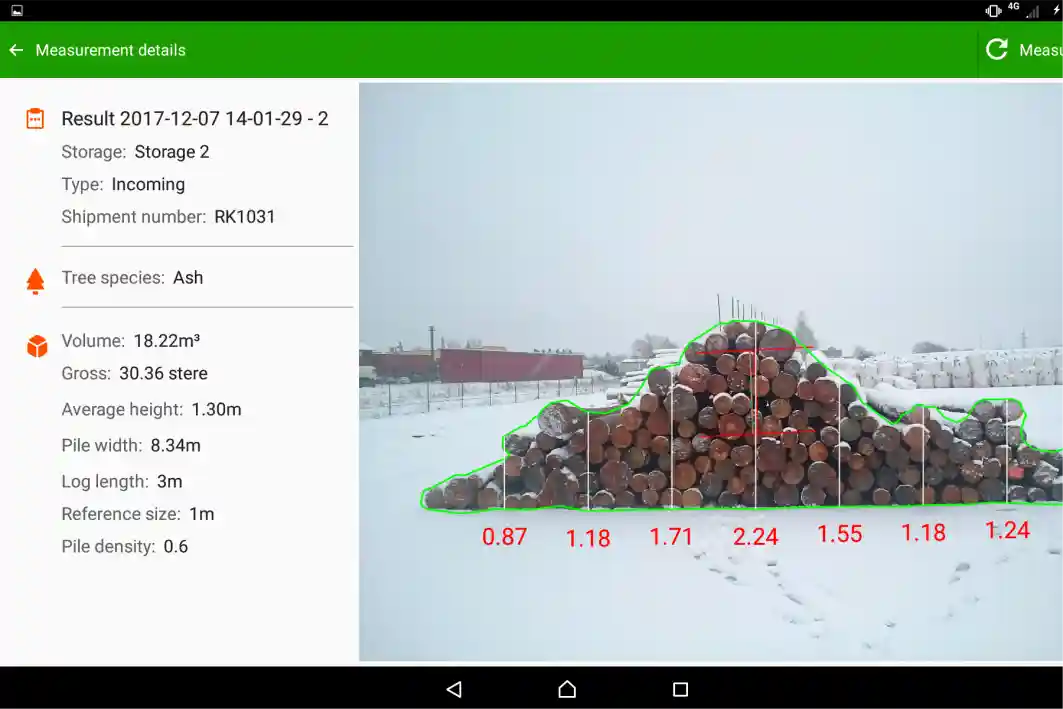
Users are able to insert a frequency (in meters) for when measuring the pile height. When the contour is created, the height is measured every (n), beginning from the furthest left corner of the pile.
So, if there’s a pile with a width of 2.4 meters and the frequency is set to 1 meter, then the height is measured at 1 meter and 2 meters as measured from the left corner of the pile.

As usual, it is possible to use the pile measurement in panorama regime for larger piles.

There’s a possibility for the manual correction of the pile surface area – the user simply needs to draw a loop around the area to be added (begin drawing on the inside of the contour, go outside and finish drawing on the existing contour) or vice-versa for reducing the pile area.
There’s also an option for users to mark the pile contour manually.
Users can measure the pile with a fixed coefficient/air filling factor or determine the pile coefficient with the help of Timbeter. In the latter case, users would need to select the pile density measurement regime and tick the Automatic pile bordering box from the data entry field.
Timbeter will also provide the results on the volume, number of logs and diameters.
Here’s the step-by-step instruction for the pile measurement with a fixed coefficient:
- Before measuring, set a reference to the pile (measurement stick/tape with minimum 1 m);
- Open the Timbeter application on your smartphone or tablet and click Start measuring;
- Make a picture, holding the device on a 90 degrees angle (the sensor will be shown with a green color). Click Measure and Save;
- Enter the required data.
Select Pile from the top row. Enter the parameters that describe the timber:
- Reference size – the length of the measurement tape/stick being used as a reference;
- Automatic pile area box ticked by default (option is also that you manually mark the area of a pile);
- Select tree species (pine, birch etc);
- Enter log length (cm);
- Insert the density (air filling factor);
- If you wish to see the heights of the pile, tick the box and insert the frequency (in meters).
If you want to specify the storage or any other additional information, select Advanced field. All custom information can be entered from the storage module. You can check the article we have written about this earlier here.

From the advanced fields you can make the following selections:
- Select the correct storage;
- Select the measurement type (inventory, incoming, outgoing, uncategorized). This is important to keep track of the volume of storage;
- Select the assortment;
-
After you have finished entering the data, click Save in the top right corner.
-
Set the reference correctly (red line needs to match the reference exactly);
-
Check the result, if needed, correct the pile surface area: draw a loop around the area to be added (begin drawing on the inside of the contour, go outside and finish drawing on the existing contour) or vice-versa for reducing the pile area.
Easy, isn’t it? Try yourself out.